Friday, January 30, 2015

Why is everyone shouting? Dialog tags and why said is okay.

Woah!  Calm down, guy!

Today, I'd like to talk about dialog tags because I was inspired from seeing some really horrible advice on a FB indie author page.

Dialog is fun to write, at least, I think so, but something keeps coming up and that's dialog tags.  Why do people hate the word 'said' so much?  It perplexes me.  Said is one of those tags that just disappears.  The reader doesn't notice it.  The same can be said of asked.  In a lot of indie published works, I see very few said's.  I see a lot of 'exclaimed', 'quipped', 'shouted', 'stated' etc.  Stop that. Sometimes, people just SAY things.  

When a manuscript is littered with quipped's and exclaimed's, it seems like everyone is either being smarmy and terrible or they're shouting.  It seems melodramatic.  It seems like too much.  And if you throw in a few adverbs, the whole thing turns purple.  

"Hello," he quipped wryly.
"Hi there," she exclaimed charmingly.
"What are you doing?" he wondered dryly.
"Nothing much," she stated blandly.

Waaaaah.  No.  It reads awkwardly.  Adverbs are another bone of contention and probably something I'll write a separate post about.  Their abuse is especially egregious when used in conjunction with 'fancied up' dialog tags.  It's lazy writing.  It's telling.  Not showing.  Which, as we all know, is the cardinal sin of writing.  

Try instead:

"Hello," he said, his smile crooked.
"Hi there," she said, bounding up to him.
"What are you doing?" he asked.
"Nothing much," she said as she lifted her shoulders in a lazy shrug.

Clearly, not the -best- writing, but you can SEE so much more when you remove the adverbs and the quipped's and exclaimed's.  It presents you with an opportunity to show character action, which naturally, reveals character.  We can picture the scene much better.  Adverbs boil down that lovely description until we can't really see what's going on anymore.  The author is just telling us, but how can we see it and how does it reveal character if we're not left to puzzle it out for ourselves?

I'm not saying that you can -never- use tags like exclaimed, but they should be used sparingly and only when something is -actually- exclaimed or shouted.  Stop being afraid of the word 'said'.  Most of the time?  It really is good enough on its own.  Otherwise, I just picture a scene where the characters are flipping out and yelling at each other. 

Wednesday, January 28, 2015

How to Make a Book Cover for Amazon's Kindle Part Five

We're ready to add our title.  I've picked a font and installed it as I showed you in the first post. Here's the font, though I'm not sure if it's okay for commercial use.  As this is just a non for profit tutorial, it should be all right to use here.

http://www.fontsplace.com/nicolas-cochin-ef-free-font-download.html  This is a great, classic font.

This font runs a little small.  Usually I do my cover titles in size 300, but for this font, I went up to 400.  In the picture below, I've circled the font tool.  Just click on that, find your font that you downloaded and choose your size.  Then just type!  You can use the move tool to adjust the positioning.
As you can see, the text is on it's own layer!  Which is great because now we're going to do some text effects.

My feeling on text effects:  Keep it subtle and simple.  That's it.  Only rules I follow.

All right.  What I wanted to do was add a bevel to the font to make it pop and look less flat.  To do this I went to Filters > Decor > Add Bevel and set the number to 15 in the dialog box that pops up.  

The next thing I did was add a black outline to the text.  To do this, I installed an extension in GIMP called Script Fu.  You have to have this.  It makes life so much easier.  https://www.youtube.com/watch?v=UJWkx3pcw0A  This link will show you were to get this plug in and exactly how to install it.  It's what I used.  It's great.

After that, I decided that our lady didn't stand out enough.  I went to her layer and right clicked it and merged it down so that the hair brush we used and the lady are now on the same layer.  Then, I went to Script Fu > outer glow and I chose a red color.  Hmm...for me?  The outline was too harsh, so I went to Filters > Blur > Guassian Blur and set the blur radius to 200.  Then at the top of the layer dialog box is the layer's opacity. I took it down to 65.  After ALL that?  This is what I have.


A lot to take in, but if you have a question, post it here. 

One of the things I liked about the sample cover was the crest with the series name. I'm going to do something similar.  

I went to deviant art again and searched for scroll brushes.  I've had this particular brush for a long time, but hopefully you can find something similar in your search. I made a new layer and sized the brush appropriately.

Under that layer and under the layer the lady is on, I took a large, soft round brush and painted white under it.  I set the layer opacity to 35 and used the smudge tool to soften the edges.  This made the scroll stand out without too much highlight.  On top of the scroll brush layer, I used a font called Great Vibes.  After all that, I put in a tagline.  

And that's it!  This is the final result:


I think it turned out really nice and close to our inspiration cover.  I hope this helps anyone trying to make their own covers.  It may be clunky at first, but keep practicing.  I'm going to do a follow up post where I talk about color theory and composition for your images.  But for now, this tutorial is at an end.  

If there's any questions anyone has, please post them!  I'm happy to answer them to the best of my ability.  

Good luck and happy cover making!  Also, if you use this tutorial to make your own cover, I'd really love to see it!  Leave me a link! 

Cheers-

Lillian


How to Make a Book Cover for Amazon's Kindle Part Four

Welcome back!  I'm really getting into the nitty gritty today. I'm going to show you how to install brushes and compose the images for your cover.

Let's get started.


Yesterday, we cut out our lady from the background.  You need to export the file and use the file extension PNG so that the background is transparent.  If you export it as a JPEG, the background will be white and that's no good!

Now go to your folder that you've exported your image to and click and drag your cut out lady over the black rose.  This creates a new layer over the black rose which is just what we want!

Position her like I've shown in the picture.  You'll notice there is a a harsh line cutting off the image.  We don't want that.  To fix it, we'll use the smudge tool again and soften it and make tendrils coming off the bottom of the dress.

Smudge tool!~


Use the smudge tool on the bottom part of the dress.


Use the smudge tool until the bottom of the dress looks like this.

Next, I need some smoke brushes.  I'm going to use red smoke like in the sample cover we're emulating.  I went to deviant art and found some great brushes which I downloaded.  The zip file is just the same as installing a font.  Extract to...Users--> Name ---> GIMP ---->brushes.  Then extract the files here.  You will need to close out GIMP and reopen it to get the brushes to load properly. 

Here is a link to the brushes I used:  http://www.deviantart.com/art/GIMP-Revnart-Smoke-Brushes-265220602

Now that I have my smoke brushes, I'm going to add them to the image.  I want to work on a new layer, so I hit Layer--> New and place the brushes accordingly.  Play around the with size, angle and placement until it 'feels' right.  These settings are on the tool's dialog box.  Hard to miss, but if you have trouble, message me.  

I also used a brush that is strands of hair. I found her hair blocky and unnatural looking.  I created a layer UNDER the lady layer and above the rose.  This is where I put the hair brushes.  You'll see what I mean on the picture.  Now, you can move a layer by clicking and dragging. 

Here's the link to the hair brushes.  You install them like you would fonts and other brushes.  Easy! http://www.deviantart.com/art/Hair-Brushes-Set-4-27031820

I also found the lady too bright and went to Colors and then Hue Saturation.  I took down the saturation by -22.  Much improved!  Now, I want her lips bright, more red.  So I made a new layer ABOVE our lady.  At the top of the layer dialog box you can see layer mode.  Usually, it's set to normal.  For this, I set it to 'Overlay'.  Then I chose a very dark red and painted over her lips with a soft, round brush.  This is what I came up with.


I'm pretty happy with this image here.  Now to pick the PERFECT font.  I want something similar to the example photo.  Let's see what I can find.  I'm going to post this, but I'm following it up directly with the end of the tutorial.  Stay tuned for part five, the last part, in about an hour.

Thanks so much and I hope these tutorials help.  As always, if you have a question, just ask!


Tuesday, January 27, 2015

How to Make a Book Cover for Amazon's Kindle Part Three

Welcome to part three of my tutorial on how to make a good, simple book cover for Amazon's Kindle.

Previously, we'v talked about images and fonts, the legality behind choosing images and what software we're going to use to create our cover.

In the first post, I talked about the size you need to make your cover.  Please refer back to that on how to open those dialog boxes.  The size we're using is 1563 x 2500 pixels.  This is taken directly from Amazon's guidelines, so you can't go wrong with this size!  Sometime in the future, I will do a separate tutorial on formatting your cover for Createspace and how to make a FULL wrap.  I'll get into how to write a great summary for the back of the cover, but for now, we're sticking to basics.

We're going to emulate a cover for this tutorial.  I did a quick google search and picked a cover that popped out, caught my eye.

What I look for in a great cover:  Eye catching and it conveys what the book is about/gives a good feel for the theme.  A popular genre these days in the indie world is paranormal romance.  Vampires, werewolves and other things having sexy times.  In a market that is flooded, you really need to stand out.  I liked this cover and I'm going to explain why it works. And what I think could be improved.


First, the color.  There are two main colors here, black and red.  It pops.  The use of red is great here. The font is easy to read, but distinctive.  The rose in the background lends romance without being heavy handed.  It's intriguing, lovely and doesn't rely heavily on gimmick.  The seal at the top that denotes it's a series is something I'm particularly fond of.  

You can ABSOLUTELY do a quality, beautiful cover like this for yourself.  As stated above, I'm going to use this cover as a guide and emulate it.  You don't want to do this for your cover, but this is used to teach you the software.  I can't do a tutorial for every genre of book, though I'm going to, at the end of this tutorial, provide a list of amazing covers for most genres, all from indie authors.  If you can master these techniques (and I think anyone can), then you won't need to pay upwards of 300.00 for a cover designer.  However, if you don't feel comfortable in your ability, by all means, hire someone!  I personally charge 35-50 for covers.  Why so cheap?  Because I want to help.  I just require a little money for my time and for the stock images I may have to purchase.  

Moving on!

I like to start from the very back and move to the front when designing. So, we're going to start at the back of this image.  There is a rose, a black one.  We can do that!  Let's find some free stock for this.  

NOW for the purposes of this tut, I'm not going to worry about whether or not these images are available for commercial purposes, because I'm not making money from this.  With that in mind, I'm going to head over to deviant art and conduct a search.

Okay, so we're looking for a rose.  We want stock images, so that's what perimeters we're going to search in!  


A quick search gave me just what I wanted!  Hurray!  Notice the link to her free stock policy. Go ahead and read that.  We're in luck!  This lady lets us use stock for WHATEVER we want. Commercial stuff too. SO you can use these images for book covers. Book mark this and save it. She has some great stuff.  

http://darkrose42-stock.deviantart.com/

So, download the image.  There should be a button to do so on the upper left hand side. 

When choosing a destination for the file, I recommend moving it to pictures.  Or create a new folder and name it something like "Photomanip material"  "Book Cover Pictures" etc.  You get it.  Now, once downloaded, go into the folder you sent the picture and move it to your GIMP canvas. On Windows 8 you can do it with your mouse, just click and drag.  I'm not sure how other programs work so please google if you have a question on that.  


Tada!  Now we have the rose on our background.  But...it's not big enough.  I'm going to now show you how to make the rose bigger and make it black.  We're going to fiddle with it until we get the look we want.  


In your tool dialog box, there is a tool called 'scale image'.  Click on that.  It's the one highlighted in blue in the picture.  Now, you will click on the edge of the rose and drag and drag until you have enlarged the rose.  Be sure to click and drag on all sides so it doesn't warp the image.  You want to get something like this: 

There.  The rose takes up the entire area of the book cover, just like in the example cover.  Let's go ahead and make it black.  Do do that, go to the top of your GIMP and you'll see "Colors". Click on that and it brings down a dialog box.  Click on 'desaturate'.  It has now made your rose black and white.  But it looks gray!  So to make it look black, we're going to go back to 'colors' and pick curves. 

So manipulate the curves by dragging points on the curved line until you get something like this.  Just play with it until you're comfortable.  I find the curves tool to be the most intuitive way to change the contrast on a picture. 

That's it!  The background is done.  Let's move up.  Let's work on another layer.  We need to find a pretty lady model to use.  It'd be nice if she's in a red dress too.  But if she's not, I have a way to change that!  Moving on.  I'm going to use the deviant art search again the same way I did for the rose.  Just search woman in dress.  Let's see what we find.

I found this lovely girl.  


This will work!  Now, this lady lets you use her stock if you credit her.  For a small fee, she'll let you use it for commercial purposes.  Sounds good to me!  

Here's this lady's stock:  http://cathleentarawhiti.deviantart.com/

And here's a direct link to this image: http://www.deviantart.com/art/Woman-in-a-red-dress-5-354980004

Now.  Download this image and open it in GIMP.  Go to the folder you sent the image to, right click it and choose 'open with' and pick GIMP.  

With our image now in GIMP, we're going to create a new layer.  You can do this one of two ways.  Both are just as good!  At the top, click on "Layers" then click on new.  Make sure your layer is set to transparent.  The layer will appear in the dialog box over the image.  That's precisely where you want it.  The other way to open a new layer is to click the layer button which I've circled, in the layer dialog box that's on your right.  

Now, we want to cut out out picture from the black background. To do that, go to the tool dialog box and choose the free select tool.  I've circled it in red.  A dialog box will populate.  Make sure you check the box that says feather edges and stick to a radius of 10.  Now, you're ready to start cutting out your image. 


I used 'colors' and contrast to brighten the image to make it easier to cut it out.  To use free select, you click to make anchor points.  It's like connect the dots!  Just click around the image, getting the line around it as I've demonstrated here.  You will go around the entire lady until you reach your first anchor point.  Connect them with a click.  It will then become a blinking line.  Go to the top of GIMP and choose Edit.  Then choose "Cut"  Then click on your new layer, the one that doesn't have an image and go back to edit.  Then click on "paste".  It will make a floating layer.  I will show you.


You will right click the floating layer and click 'anchor layer'.

Go down to the first layer and delete it.  You will end up with something like this: 


Great!  Let's soften the edges and clean it up.  I'll do this and then tell you what I did to improve the look of this image. 

Here's what I did.  I used the erasure and chose a soft, round brush.  You can find your brushes under your layer dialog box.  I made her less blocky looking around her hair.  Then i went in with the smudge tool and softened the lines of her hair.  The smudge tool looks like this: 


Then I brought up the Curves tool again.  Color--> Curves and I played around with the image until I made her vampire pale and her hair coal black.  I'm happy with how she turned out, but I want her hair to look more natural.

This is a good stopping place for this part of the tut.  Tomorrow, I'm going to show you how to download brushes and install them.  We'll play with this image some more and make it really stunning.  I will show you how to do this.  

If you have any questions:  rachel.zellers@gmail.com or leave a comment and I'll do my best to explain anything I may have left out.  

Cheers-- Lillian


Monday, January 26, 2015

How to Make a Book Cover for Amazon's Kindle Part Two

Hello, everyone.  Last time, I introduced the software we were going to use for making a cover.  I'm going to veer away from that a little.  Don't worry, though, we'll get back to the technical nuts and bolts in my next post.  So, if you know all about images and fonts, you are free to skip over this part!

At the end of this post, I will show you how to install a font in GIMP.


Images and Fonts:

There's a lot of plagiarism in the indie world of publishing.  I see a ton of articles on it.  Call out posts, etc.  We hear about it from the writing stand point, but rarely the cover art.  Well, images are stolen a lot.  And it can get you into hot water.

The best way to avoid having this issue is to either purchase stock photos or to use free ones.

Things to keep in mind when buying stock:

You will not own this image.  You merely own the rights to use it.  What that means:  You can purchase the rights to use a photo, but that means someone else could use the very same one.  Usually, that's not really a problem, though I see a lot of the same photos used over and over.  Try to pick something unique and if it really bothers you?  You can buy the photo.  Then you DO own it and no one but you can use it.  That, however, is not usually financially feasible.  Buying a photo is usually around 400.00.  And that's on the cheap end of the spectrum.

What I recommend:  Choose photos carefully.  Think about your readership.  The feel of your book. If you write romance, try to be unique.  Pay attention to trends and best sellers.  Buy good stock.  Don't worry about the rights.  The cover is to draw a reader in, the writing is what makes them stay.

What to look for in a stock image:

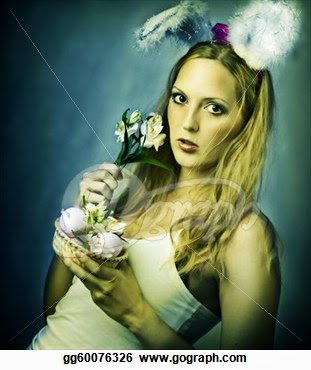
Okay, some stock photos are better than others.  I will give you, first, an example of a bad stock photo:


Other than being sort of a ridiculous picture, I'll explain why this is a bad photo to choose.  The filter used.  Avoid colored filters and textures.  You want simple backgrounds and models that haven't been photoshopped too much.  You want clear.  You want big images. choose large images to purchase.  When we work with images in GIMP, we don't want a lot of pixelation.  It really can ruin the cover and make it look very unprofessional. 

Here's an example of a good photo.  This is stock I've purchased for cover work for a client.


Obviously for an erotica cover, but notice how clear it is.  It's a large image as well.  The background is very simple.  As a cover designer, I have hundreds of stock photos.  You won't need that many if you're designing just for yourself.  Stock photos run me about 3-5 dollars for one picture.  That's not bad!  I think most people can afford that.  I use one site.  They have pretty much everything I could ever need. 

http://www.canstockphoto.com/  Great site.  Tons of pictures of just about everything.  You buy credits (15 and up) and then use the credits to purchase the use of the photo.  The photos purchased from this site allow commercial use.

THIS IS IMPORTANT!  If you find some good, free stock, make sure it says it allows commercial use.  Sometimes, they don't and require you to pay some money in order to use their pictures for commercial purposes.

Good places to find free stock:  www.deviantart.com  and http://www.entrepreneur.com/article/238646  The last link offers links to some of the best, free stock sites that allow for commercial use.  

What to avoid:  

You want to stand out but at the same time, you want to fit in.  A hard place to be.  It's important, I think, to follow/pay attention to trends and take inspiration from this. Don't copy.  Take inspiration. 

A special note to romance authors:

Stop the headless torso abuse.  There are too many of these covers.  I did a quick google search and came up with this.  Ha.  


Torsos!  Torsos everywhere!  I think at this point, there's nothing you can do to that sort of cover that helps you stand out.  

Font:

Now, on to font.  Font, like images, sometimes have to be purchased.  These are usually pretty expensive.  Especially if you're working on a very tight budget.  And you've already purchased a stock photo.  

There are a TON of free fonts for commercial use.  www.dafont.com was recommended on my FB post about this blog and I couldn't agree more.  It's what I use.  It also tells you where you can use the fonts and how.  Again, you'll want to look at other covers and see what they're doing.

What to look for in a good font:  Readability.  Does it make sense for your cover?  Picking a hand drawn script font for a hard boiled detective novel is probably not your best choice.

Fonts to avoid.  Avoid them forever.  

This is going to upset some people, I realize.  I apologize for that in advance.  This is designed to help!  

Moving on.  These fonts are terrible.  Awful.  

Papyrus


Why it's bad:  Overuse.  And it's just not a pretty font.  There are better ones.  If you're going for Old World, etc, there are just better fonts out there.  It's become the Ariel font of 'fancy fonts'.  It's just used too much.  People literally make parody book covers using this font.  Avoid.

Stencil


Why it's bad:  Again, overuse.  I see it slapped on there in bright colors over an image and it is literally telling me nothing about the book.  I see it on all genres.  I cringe every time.  There are better fonts for military sub genres and for the love of all that is holy, stop using this on zombie novel covers.

The Twilight font.  You all know what it is.  No.  Just no.  

Overly loopy romance-y script fonts.  Stop.  I can't read them.  Neither can anyone else. 

Big, ugly chunky blocky fonts.  Sure, I can read them. But they offend mine eyes.


Great fonts:

Trajan Pro.  It's an excellent font!  It's bordering on overuse, however.  Just about every movie poster ever has it.  Keep it to the tag lines.  

Great Vibes:  A script font that is easy to read and conveys romance.

Helvetica:  Hipster-y, I realize, but a nice font anyway.  

Baskerville:  Simple.  Clean.  Classic.

Garamond:  Another clean, professional looking font.

The last word on fonts:

Can you READ IT?  Font on book covers should probably be white or black.  It just helps with the readability.  Watch putting a lot of special effects on your fonts (glows, embossing, etc).  It looks tacky most of the time.  There are exceptions, but remember, less is more.  Especially with font.  Don't go gimmicky with your font.  It's tacky.  Look at movie posters, best selling books, etc.  See what font they use.  When in doubt?  Google it!


Now for the technical side of things.  Let's say you've found your perfect font.  How the heck do you get it into GIMP?  I will show you.  It's amazingly simple.


I'm using dafont.com as an example.  I'm choosing a deco font because it's nice!  Go to download, click on it.


When you download a font, check the file.  You will get a zip file.  In order to open a zip file, you will need a program like WinZip.  Google it, download it.  It's free on a trial basis, but you can use it forever. Follow the instructions for the install.  If you have trouble with this, message me. I'll try to help you.

Okay, you're going to want to extract the files from the zip folder into your GIMP folder.  Under fonts.  Make sure the file extension says .ttf.  But I've never downloaded a font that didn't have that extension.  Still, something to be aware of.


To find your GIMP folder:  Go to OS ---> then to Users.  Open your user file (probably your name) and then open GIMP.  Then click on fonts.  Hit 'OK'.  


That's it!  If your GIMP is open when you install the font, you will need to close it out and re-open it for it to show on your font list.  


On your left, in the tools dialog box,  you will see a bold A.  That brings up the font dialog box.  From there, you click on the font already there and it will bring down a drop box.  The fonts are organized in alphabetical order and you can find your font easily that way.  Click on it.  Then click on the background and start typing.  The font dialog box allows you to change the size.  The default size is 18.  That's WAY too small for a book cover.  MOST book covers are done with size 300.  Author name 175.  Taglines: 100.  That's the formula I use.  And it works.  Some fonts, however, are bigger than others so you need to play around and see what works best.

Notice too, that the font is now on a new layer!  Hurray!  This lets you manipulate the font without changing the background.  Remember, GIMP works in layers.  

Okay.  That's it for today.  Part 3 will come tonight or tomorrow.  I will then start getting into the nitty gritty of book cover design.  Choosing and working with color and how to manipulate your stock photo (ie:  How to remove the background, how to change the colors, how to add borders, etc).  

Thanks for stopping by!  I hope you found this helpful.  

Cheers-

Lillian


Sunday, January 25, 2015

How to Create a Simple Book Cover for Amazon's Kindle Part One

First, let me say this:

Cover designers are great!  I know a lot of them and really admire their work.  I love doing book covers, myself.  This tutorial is for a simple cover.  I'm going to take this in steps, over several posts. It's going to take me several days to write this up, so patience please.  If you feel that a cover designer would better suit your needs, by all means, I'm not advocating that you shouldn't hire one.

Now, onwards!

Step One:

I highly recommend going to google and using the image search to find best selling titles in whatever genre you write in.  I'm not saying that you need to copy them directly, but this is a great source of inspiration. Notice that most covers are very simple.  No crazy, loopy text.  No retina searing colors. Simple.  You want your cover to look professional.  I'm going to provide a lot of examples of what WORKS.  I've had a lot of indie authors email me and show me their covers and ask for critiques. My inbox and blog are open!  If you want me to give an honest and fair critique of your cover with suggestion for improvement, I'm happy to do so!  

Moving on.  Think about the mood of your book.  Dark?  Light?  Romantic?  Intense?  Genre has a lot to do with how you're going to design your cover, but theme and mood are also really important. If you've written a hard boiled detective noir novel and your cover is bright orange with some bubble sans font, well, you get my point.  You aren't going to reach your audience. 

Also note in your research what's over done.  Let's pick on romance covers for a moment.  I know they're easy prey, but bear with me!  Put an end to headless torsos.  There are just too many of these and you want to stand out.  I'm going to pick on the horror genre next:  No more blood spatter font. It's hard to read and gimmicky.  You don't want your cover to look gimmicky.  You want classy, simple and most of all?  You want it to linger in your potential reader's mind.  A tall order, I know.   But keep in mind what's the standard in the industry, what's overdone, and use common sense.  Note what catches YOUR eye.  If it caught your eye, the chance of it catching the eye of someone else is pretty high!


Step Two:

You're going to need a photomanipulation program.  For the purpose of this tutorial, I'm going to recommend GIMP.  It's what I  use.  It's an easy program to learn, though a bit difficult/tricky to master.  This first post is really going to give the basics of GIMP.  And don't worry if you're not the most computer savvy person!  I will include step by step photos on how to install GIMP and various brushes and fonts you'll need to work on your cover. 

FYI:  I use Windows 8.  If you have another version of windows and are having a hard time installing, please read the help guide on GIMP's website.  

Go to www.gimp.org.  Right there at the top right is a big orange button that says download.  Click away!


In order to proceed, you're going to need a torrent program as the download comes this way.  I recommend using bittorrent.  It's safe and easy to use.  www.bittorrent.com.  Follow the directions and download this.  Then you're ready to download GIMP and install it.


Okay, with bittorrent installed, you can download GIMP.


When your torrent is finished downloading, simply click on it and open it up!  Install GIMP from that folder.  Easy!  If you have any trouble, please message me or leave a comment here and I will do my best to answer.  Or, you can use the help guides on the GIMP website.  


All right!  You have GIMP installed.  Let's talk about some of the features of this program and how to use them.  For the purposes of this tutorial, I'm sticking to simple.  I may do a more advanced tutorial in the future, but this is definitely for beginners and I'm trying to make it as comprehensive as possible.  I include pictures because I'm a visual learner. I hope they help.  If you are having trouble with any of the steps, please comment or google what issue you're having.  There are a ton of guides on GIMP online!

1.  Layers!  

Layers are really important in GIMP.  Instead of trying to explain this with words, I'm going to show with pictures.  


In order to make a book cover, you will need to open a new layer in GIMP.  Click 'File' and then 'New'.  It will open up a dialog box.  Now, this is for ebook's only for kindle.  This is the size you need to use from Amazon's guidelines.


You are going to need to make sure that 'px' is selected.  This stands for pixels and your image needs to be 1563x2500 to comply with Amazon's guidelines and to create the best looking cover.  Click 'OK' to proceed.

You should get something that looks like this.  Now, consider this our blank canvas.  This is where we're going to put images.  One layer at a time.  This layer, we won't do a thing with it.  It will remain just as it is.  I find it's just a good idea to keep the background as is, even if we can't see it at the end of the process.

The way GIMP works, is that each image will be on it's own layer.  I will show you, in part two, how to choose images, where to get stock photos, and how to make them work for your cover.  I will create an original, simple design.  Feel free to copy it, step by step, so you can learn.  

This concludes part one.  I will start Part Two with where to find cheap/free stock images and talk about the importance of buying your stock or using stock that is free for COMMERCIAL use.  I will explain what the various licenses mean and tell you how much money you can expect to spend.  

I hope this helps!  Expect part two later today.  For now, my brain and fingers need a break, darlings. If you have any trouble, please email me:  rachel.zellers@gmail.com or leave a comment here.  

-- Lillian

Introduction

Welcome!

Hi there.  My name is Lillian Asterios.  It's a combination of my pen name and married name, however, in a couple weeks, it will be my legal name.  I'm 35 years old, mother of three, wife and co-author of the Books of Belshalara, a dark fantasy series that I write with my beautiful, wonderful husband, Meriweather Asterios.  I am also a traditional artist and graphic designer.  I love to bake, craft, and be loud and opinionated.

This is my intro post, so you, my reader, can get to know me a little better.  What can you expect to find on this blog?  Tutorials (book cover design, ebook formatting, crafts, cooking, make up and anything else I can think of, or that people ask me to do), advice on getting into the business of ghost writing and other freelance jobs, opinion pieces on cover design, marketing and other writing related issues, and some guides on various topics that happen to strike my fancy at the time.  

I'm a lady of various interests and values.  I am an active member of the LGBT community here in Tulsa, Oklahoma and an ally/supporter of transgender equality and rights.  My husband is FtM (female to male) transgender.  I'm happy to answer respectful questions, but please don't cross the line.  This is not a place of debate.  This isn't a democracy.  Please respect me and I will respect you. You're free to disagree, but I would rather you keep those opinions, especially those on my relationship and marriage, to yourself.  

I just want to start an unpretentious dialog on the craft of writing and design, and offer my help where I can.  We're all in this together, us independent authors and artists, and there are strength in numbers! Let's work together to make the community of indie authors a place of growth.

Thanks for stopping by!  This blog is fairly new.  I actually created it to post a tutorial on book cover design.  Please be patient while I write up new content. I will try to update this once-twice a week.


--Lillian